


Sign Up for Our Newsletter to get the best discounts and offers
You don’t need to wait for Spring to start a new planting project… terrarium building makes an excellent family activity or weekend project. Follow the steps below to get started today!
Step 1: Picking your Container
A good terrarium container is anything clear! Look for the perfect glass or plastic container that matches the decor of your home. The opening of the glass can be big or small, depending on what size plants you prefer to add.
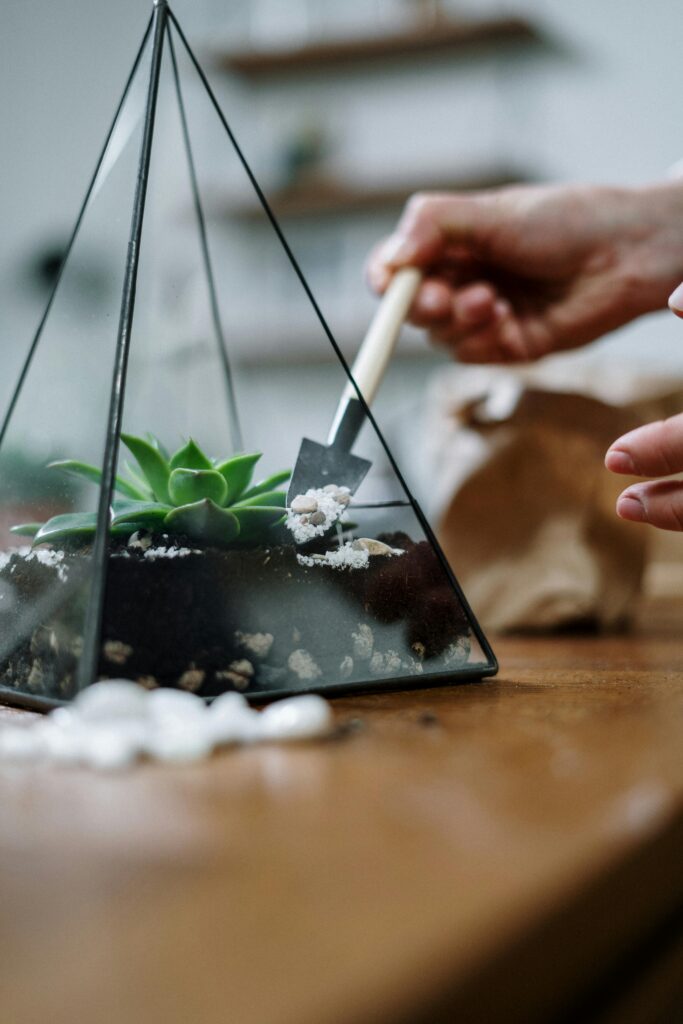
Step 2: Constructing your Terrarium
The key to making a healthy environment in your terrarium is to work in layers.
- First, add 1/2-1″ of coarse sand, gravel, or pebbles. This is the drainage layer that will capture excess moisture.
- Add a thin layer of charcoal granules. Charcoal keeps odors from developing.
- Add a layer of Sphagnum Moss. Moss keeps soil from seeping into the drainage layer.
- Add 1/2-1″ of well-draining, fertile potting soil.
Step 3: Build your Terrarium
Begin by adding your preferred plants. Simply dig a small hole and use a spoon or mini shovel to cover the roots with soil. For a more interesting design, use an odd number of plants. this will heighten the organic nature of the terrarium. Try not to crowd the plants too much as they will grow into each other.
After you have added your plants, several different decorative options can be added to a terrarium to enhance the aesthetic you are going for. If you are trying to create a more naturalistic environment, sticks and rocks are a great addition. Some people may prefer to add small statues or figurines to create a more fantastical aesthetic.
If you are having difficulty sourcing the substrate materials for your terrarium, we have everything you need here at the garden center! Simply stop by our North Branford location and we will help you with whatever you need.
When it comes to finding the perfect houseplant for your space, it is important to take every factor into consideration. Plants are living things that need sunlight, water, and food, and while it is important to make sure your plants are being cared for and remain healthy, it is equally important to keep the other living things in your house just as safe. Of course, we are talking about your pets and kids–any living thing that might possibly ingest plant material without you knowing.

There are hundreds of thousands of plants in the world, and while we might not always have the bandwidth to study the biological effects of those plants on humans and animals. Thankfully, we can turn to the ASPCA for these concerns. the ASPCA has compiled a list of plants (both indoor and outdoor) that fall under two categories: toxic, and non-toxic. These lists focus on plants both toxic and non-toxic to dogs, cats, and horses.
You can check out the list for yourself here: Toxic and Non-Toxic Plant List

What Are Some Common Side Effects?
When our pets are feeling unwell, an illness can present itself in a number of ways. It is also important to remember that animals may have different reactions to different plants. If you know you have a toxic plant in the home, here are some important symptoms to be on the lookout for:
- Difficulty Breathing
- Increased Heart Rate
- Slow Heart Rate
- Vomiting
- Diarrhea
- Liver Failure
- Tremors
- Drooling
- Loss of Appetite
- Swelling and Burning Tongue
- Difficulty Swallowing or Breathing
- Rarely, Death
It is important to call poison control immediately if you notice any of these symptoms in your pet. It is equally important to investigate the houseplant for any teeth marks or tears. Even if you don’t see any noticeable marks–depending on the plant–your pet may have eaten an entire leaf, so ingestion cannot always be ruled out.
For the ASPCA poison control, call 888.426.4435 Or you can download the Animal Poison Control App

Tips and Tricks to Keep Pets Safe
When it comes down to it, there are some pretty easy ways to keep our pets safe from potentially toxic plants. With dogs, plants can simply be moved to a higher elevation as most dog breeds won’t be able to reach on top of a shelf or countertop in pursuit of the plant. Horses are even easier to care for, as toxic plants can simply be removed from barns or open areas where the horse roams.
The real culprits, unfortunately, are cats. They may be adorable but they can be devious. Cats are agile creatures and can reach indoor heights that dogs cannot, so in most instances, these traditional methods of simply “moving plants out of reach” don’t really work on cats. Here are some special tips and tricks to avoid exposing your cat to potentially toxic plants:
- Move Plants to Other Rooms: Sometimes the most obvious solution is the one that works the best! If you have a room in your home that you don’t let your cat into unless supervised, simply place your plant in that room so that your cat will have no access and never become curious of the plant.
- Place the Plant in an Impossible to Reach Spot: If you have an area of your home that your cat simply cannot reach (no nearby footholds) then your plant may thrive there. Just ensure the plant receives adequate light and water.
- Move Plants to an Indoor Greenhouse: If you want to collect plants you know are toxic to your pets, there are purchasable indoor greenhouses, as well as DIY videos on how to create the perfect indoor greenhouse fit for your home. You can always ask us for extra advice on indoor greenhouse necessities and resources.

Non-Toxic Plants We Carry:
According to the ASPCA and the guidelines set on their database, Van Wilgen’s has a number of plants in stock at our glasshouse that have been deemed non-toxic. Please note that even non-toxic plants might cause minor irritation and nausea for your pet, so it is always important to take the ASPCA’s database into consideration prior to making a determination for what is right for your pet.
- Boston Ferns
- Ponytail Palms
- Hoya Plants
- Button Ferns
- Prayer Plants (Calatheas)
- Burros Tail
- African Violets
- Parlor Palms
- Bamboo
- Spider Plants
- Bromeliads
- Peperomia
- Pilea
For more information on houseplant toxicity for your pets, visit the ASPCA. We hope to see you soon!
Whether you own a home, rent an apartment, or just want to add something decorative to your office or dorm, houseplants can be the perfect accent piece. But let’s face it, not all of us are decorators or have an eye for interior design! One thing that I found makes decorating a little easier is separating plants based on which room you are trying to decorate.
Many people like to welcome plants into their living room and bedroom–two rooms that can have a diverse array of lighting environments. It is important for houseplant health that they receive proper sunlight, so you wouldn’t want to place a Snake Plant by a south-facing window where it will receive too much bright direct light.
Houseplants also have different requirements when it comes to temperature and humidity, so it is important to not stress the plant out with certain issues like window drafts, excess humidity, or dry air. Calathea, for example, is a sensitive plant when it comes to humidity and temperature, it will thrive in environments like bathrooms and kitchens (or truly any room with a humidifier) but might suffer if placed in an entryway near outside doors.
Plants are particular about where they are placed, but most houseplants are hearty and can tolerate a range of environments, like the Chinese Evergreen. If you need assistance in finding the perfect plants for your space, our Houseplant Specialists will assist you every step of the way!
We hope to see you soon!
With spring just around the corner, now’s the perfect time of year to consider giving your houseplants plants a little refresh. Give them a fresh start this season with some new soil and maybe even a larger container. So, gather up your plants, a bag of potting mix, and let’s get messy! (Your plants will thank you!)

Repot vs. Refresh
Before you immediately start hunting down larger pots for all of your houseplants, consider whether your plant actually needs it. Sometimes “repotting” can just involve refreshing your plant’s soil, and not necessarily putting it in a new container. Since plants can deplete the nutrients found in soil over time, just replacing the soil occasionally can actually be quite beneficial.

When to Repot
We frequently get asked how often you should be repotting your houseplants into a new container. Typically, you can expect to repot approximately every twelve to eighteen months depending on how quickly your plant grows. That said, there are some slow-growing plants that will be happy in the same container for many years before it’s time for a larger pot.
So how can you tell when it’s time to go for a larger container? Keep an eye out for some of these signs:
- Roots growing out of drainage holes.
- Roots pushing your plant out of the container.
- Slower than normal growth (not counting winter dormancy).
- Your plant is drying out more quickly than usual.
- Considerable salt and mineral build-up on the plant or container.
Still not sure? Push your finger into the soil and run it around the inside edge of the container. If you can go all the way around without hitting a root, you can hold off on upsizing.

Choosing your Pot
If your plant does need a larger container, generally you shouldn’t go more than 1-2” larger than the current one. You simply want a little extra room for your plant to grow into.
You might think that jumping up a few sizes will save you time in the long run but going to too large of a pot will lead to a few problems for your plant. When a houseplant has lots of extra space in the pot, the plant will focus its energy on growing new roots to fill the space which can adversely affect growth above the soil. Additionally, too much extra soil around the roots can actually absorb too much water, potentially leading to root rot.
When choosing your container, in addition to paying attention to the size, you should also be looking for containers that have drainage holes at the bottom, and a saucer to catch any excess water. Too much water collecting at the bottom of your container without a way out can also cause root rot, which is why we always recommend having containers with good drainage.
You should also be mindful of the material of your container. Something like terracotta, which is absorbent, will soak up water, meaning you may have to water more frequently. If you tend to overwater, or if your plant likes more of a dry environment (like cacti) this may actually be a beneficial material to use. Glazed ceramic containers on the other hand aren’t absorbent at all, so any excess water will either be absorbed by the soil or will drain to the bottom of the container. Plants that like a moist environment (like peace lilies) may do better in a glazed container. Be sure to check out our watering guide for additional watering tricks.

Choosing your Soil
Be sure to use the appropriate soil for your plant. We recommend our own Van Wilgen’s Professional Potting Mix for most containers, though with some finicky plants you might need a plant-specific potting mix, especially for orchids, cacti, succulents, and African violets. The main difference is how quickly the soil will drain. Potting soils tend to be “heavier” since they retain water, while cactus mixes, for example, are “lighter” since they’re more porous and don’t absorb as much water. For this reason, we would also recommend against using something like garden soil since it’s much heavier and can actually smother your houseplant’s roots.

How to Re-pot
Steps to Re-pot:
- Carefully remove the plant from its container by tilting it sideways and gently pulling on the base of the plant until it slides out. If the container is a thinner nursery pot, you may be able to squeeze from the bottom of the pot to easily remove it.
- Remove old potting mix from around the root system. We recommend removing about one-third of the soil that’s in the pot.
- Take a few moments to loosen up the plant’s roots. If the plant has been in a too-small container for too long, you may notice that the plant is root-bound. Carefully pull apart tight coils of roots, especially along the bottom of the plant. If you happen to notice any signs of root rot, carefully clip away affected areas, making sure to clean your tools in between cuts.
- Add a few inches of fresh potting mix to the bottom of your container, and then carefully set your plant atop the new soil, making sure it’s straight and centered. Add additional potting mix around the sides until it’s stable. Avoid packing the soil too tightly in order to let the roots breathe
- Give your plant a drink, until you see water draining from the bottom of the pot. Even out the soil at the top of the container, and if necessary, top off with some additional soil.
As we head into the fall, and as temperatures start to drop, it means closing up those beautiful outdoor spaces we’ve spent all spring and summer creating. (Raise your hand if you’ve had your own staycation in your personal patio paradise.) One silver lining to this situation is that any houseplants which had been relocated outdoors (to perfect those tropical getaway vibes) will soon need to come back in. If you tend to collect houseplants like a lot of us here do, that means the inside of your home is about to get a LOT cozier with houseplants. You still have a little time, but once the temperature starts to drop into the 50’s you’re going to want to start transitioning your leafy friends indoors. To keep your plants happy, we’ve compiled a few easy tips you can follow when bringing them inside.
Insect Control
Before you bring any plants in, spray them down from top to bottom with horticultural oil or Neem oil to suffocate stowaway insects (and their eggs) including mealybug, scale, and aphids.
You’ll also want to treat the soil for fungus gnats which won’t harm the plant but can be a huge nuisance to people. Punch holes in the soil with a pencil and sprinkle Mosquito Bits on top of the soil to stop them in their tracks! You can also use Sticky Stakes to catch some of the adults and stop them from mating. If Mosquito Bits don’t work, you can apply Diatomaceous Earth in the same way to get rid of other soil-dwelling critters from mealybugs to ants to sow bugs.
Fertilize
Give all your plants an appropriate fertilizer as a last hoorah for the season. Just remember most houseplants can take a little break from fertilizer through the coldest winter months, so you won’t need to fertilize again until the spring.
Acclimate Slowly
If possible, bring plants in slowly over a week’s time. If the pot isn’t too heavy for you to move around, bring your houseplants in during the cold nights and back out during the day. Once daytime temperatures reach 50 degrees, bring them in full time. If one of your houseplants is used to the full sun, slowly get them used to a little shade before bringing them right inside. The light inside is quite different from the sun outside. In other words, don’t shock your houseplants!
Wash Your Windows
Do a little fall cleaning and clean up the dirt and dust on your windows. In this case, a little dirt can hurt. For those houseplants that need a brightly lit space, like succulents, you would be surprised how dusty windows can really reduce sunlight inside.
Humidify
There are some plants that are really fond of lots of moisture and sometimes they need a little extra care. For plants such as Easter lily and Gardenia, place a saucer filled with pebbles and water underneath the pot so they can soak up the evaporating water.
Don’t Overwater
Too much water is a common cause of the demise of houseplants, so water on the side of caution. For most plants, allow the soil to dry out a little bit before watering it all the way through again. ZZ, Ponytail Palms, and Begonias would greatly benefit from this practice.
Houseplants are great! They liven up any space, and even purify the air! But it can sometimes be tricky to take care of indoor plants when each plant has its own needs. The number one thing most people seem to struggle with is probably the most basic – water! Whether it’s too much or not enough, it can cause stress on your plants if conditions aren’t just right. To help keep your plants happy we put together a simple watering guide so you can maintain a healthy and thriving plant.Below we’ve compiled a list of our most popular houseplants and how often you should be watering. Don’t see your plant listed? Feel free to give us a call, or stop by. We’re here to help!
EVERY TWO WEEKS
These plants thrive when you water them sparingly, roughly every two weeks is just right.
- Aloe Vera
- Bromeliads
- Cactus
- Cast Iron Plants
- Jade Plants
- Orchids ( in Moss no ice cubes!)
- Ponytail Palms
- Sago Palms
- Spider Plants
- Snake Plant
- Succulents
- ZZ Plants
EVERY WEEK
These guys like to be watered a little more frequently roughly every week, keeping the soil moist.
- Dracaena *small amount of water at a time
- English Ivy
- Fiddle Leaf Fig
- Flamingo Flower
- Philodendron
- Norfolk Island Pines
- Orchids (in bark, no ice cubes!)
- Pothos *small amount of water at a time
- Schefflera
- Rubber Plants *small amount of water at a time
TWICE A WEEK
Our next group really likes to keep the soil moist at all times. However, be careful not to overwater. You do not want the soil soggy, just moist. Water roughly twice a week.
- Areca Palms
- Ferns
- Croton
- Peace Lily
- Staghorn Ferns
GET THE MOST OUT OF YOUR HOUSEPLANTS
(BRINGING PLANTS IN FOR THE WINTER)
You invested good money and time into your summer plants. You may have enjoyed tropical Hibiscus, sweet-smelling Gardenias, and luscious Lemons out on your deck or patio all summer long. All of these plants love the summer heat and the more sun they can get, the happier they are. BUT…There is always a BUT, isn’t there?! It is starting to get a little chilly. These plants are going to get a little sad once nighttime temperatures dip below 50 degrees. You don’t want sad plants, do you? I have some tips for cheering them up this fall and winter:
*Bring plants inside slowly. Baby steps always work best. If the pot is not too heavy, bring the plant in at night and back outside on a warm fall day. If you cannot move it in and out daily, tuck it in closer to the house to keep it a little more protected. If you must move it inside in one fell swoop, put it in the sunniest spot in the house if it was used to getting tons of sun outside.
*Treat plants first. Give them a nice shower with Neem Oil or Horticultural Oil. Spray the leaves, top, and bottom. Spray all branches. The oil will suffocate any sneaky insects or eggs trying to make their way into your cozy, warm winter house.
*Treat the soil first. Use a granular Houseplant Systemic Insect control on the soil. The systemic helps to eliminate soil-dwelling pests like fungus gnats. In addition, the plant absorbs it all the way through every branch and leaf, protecting houseplants from the inside out. Aphids, Whitefly, and Scale get one taste and they are toast!
*Treat the soil first. Fungus gnats can be a real bear to get rid of once they lay their eggs in the soil of your plants. They look like little fruit flies and are just as much of a nuisance. You can treat the soil with Systemic Houseplant care or with organic Mosquito Bits. Trust me, take a moment to do this because once Fungus Gnats make your home, their home, you will not be smiling.
*Fertilize. Use a slow-release fertilizer so they can feed slowly while spending the winter months inside.
See, the “BUT” wasn’t so bad. A little attention to your houseplants now will keep them from being sad inside. Keep them happy with a little extra TLC.
Come see us at Van Wilgen’s. We would love to help!
SHOPPING LIST:
*Neem Oil
*Horticultural Oil
*Systemic Houseplant Insect Control
*Mosquito Bits
*Van Wilgen’s All Purpose Control Release Plant Food
“This orchid is so beautiful but how the heck do I take care of it? I’d probably just kill it!” This is what I hear from a lot of our Van Wilgen’s customers and I respectfully beg to differ with you. Orchids are fairly easy and the main variety we carry, Phalaenopsis, blooms for months and yes folks, you can get it to rebloom again and again. If patiently waiting for an orchid to rebloom is just not your thing, then do as Ryan Van Wilgen suggests and simply enjoy them for the 3 months that they bloom. That is more than you will get from any cut flower bouquet. Don’t let the orchid’s slender and delicate-looking beauty fool you. They are tougher than you think and can handle any type of home from a quaint cottage to a New York City apartment. Care is pretty basic but there are a few things we should discuss.
Orchids need 4 main things to be successful: light, temperature, water, and fertilizer. The beautiful orchids you buy at Van Wilgen’s will keep you happy if you keep them happy.
Light: Phalaenopsis/Moth Orchids can thrive in a little less sunlight than some other varieties. A brightly lit window will do, but pounding, direct, southern exposure may give your orchids a sunburn. Ouch! Believe it or not, the more yellowy/green orchid leaves look, the better the lighting is. The darker green the leaves are means that they could use a little more sunlight. I know the leaves look healthy but chances are you will not get another bloom. If your orchid leaves have a reddish tinge or streak to them, they are getting too much sun. Play with them in different parts of your home. Their color will let you know when they are pleased.
Temperature: If we think about the fact that orchids come from and thrive in warm, tropical climates, then it makes sense they would like a fairly warm home. Orchids do fine in our consistently 70-degree houses. Damage can be done if temperatures drop below 60 degrees. The only time we want our orchid friends to experience a cold shock is in the fall. This will push them to produce a flower spike. Often, we recommend putting them by a cooler window or opening the window at night to give them a temperature drop. The drop in temperature for a few weeks (only down to 55 degrees minimum) seems rather cruel but they tend to like it. Consider doing this around September/October.
Water: We all need it but orchids need it in the form of watering and humidity. A good rule of thumb that I like to follow is to water the orchid as many days apart as the pot measures in inches. For instance, if your orchid is planted in a 5-inch pot, water it every 5 days. Easy, right?! Give your orchid a real treat and set it in a tray with rocks and water. Ahhhh, humidity, they love it! The orchid roots need to sit on the rocks, above the water, not in it, or you will get root rot. This constant release of humidity gets absorbed by all the air roots and orchids thrive. Misting an orchid is just not the same as a tray full of pebbles and water. Misting can actually cause some unwanted fungal leaf problems. No ice cubes folks, remember they are tropical plants.
Fertilizer: There are many schools of thought on fertilization of orchids but I think we narrowed it down to the easiest and one of the most productive programs using Jack’s Classic Orchid Special 30-10-10 and Jack’s Classic Orchid Bloom Booster 3-9-6. First, we need to understand the cycle of the Phalaenopsis orchid. We talked about what a long bloomer it is (yay!) but we did not discuss the time of year it usually likes to bloom. Late spring and summer are times for vegetative growth of orchids, meaning they are busy producing leaves and strong healthy root systems. We need to up the amount we fertilize them for these months and use Jack’s Classic Orchid Special 30-10-10. A higher dose of Nitrogen (the first #) is necessary because our orchids are planted primarily in bark and bark gobbles up the Nitrogen. In fall, most orchids will set their spikes to get ready for winter and early spring bloom. During the fall and winter, it is important to fertilize with Jack’s Classic Orchid Bloom Booster 3-9-6 because the higher Phosphorus (the middle #) will get the spike going and keep the flowers blooming longer. “Fertilize weekly weakly” is a common expression used for orchid care. You can either fertilize your orchids weekly with Jack’s at a ¼ dose rate or 1X per month at full strength in the fall and winter. In spring and summer, fertilize at a ½ dose rate or 2 times per month. I am giving you choices so you can have a say in how you care for your beloved orchids. Remember, orchids are tough, so don’t over-love them.
Now, throw every piece of advice I gave you away. Tee hee. I’m just kidding with ya. What I am really trying to say is there are different ways to care for your orchids. My suggestion is not the be-all and end-all of orchid fertilization but I guarantee, it will help. Come see us at Van Wilgen’s Garden Center. We would love to help!