
Sign Up for Our Newsletter to get the best discounts and offers
VW Grown Favorites
Brandywine Red – Heirloom with huge tomatoes that produces extremely well all season. They are a bit misshapen but don’t let that discourage you. The shape is weird but the flavor is great! Considered one of the best-tasting heirlooms that are great for slicing.
Early Girl – Just like the name says… this is one of the shortest times to harvest tomatoes. The fruit is medium and an all-around utility player, good for salads, sandwiches, and slicing.
Grape – What’s the difference between cherry and grape tomatoes? Grape tomatoes are shaped just like a grape, longer and oval, while the cherry is perfectly round. Grape is meaty and crunchy with the classic tomato taste.
Patio Red – This small package packs a big punch. The plant is small but the yield is not! Perfect for small-space gardening or growing in pots. The plant reaches only 2 feet tall on a sturdy stem. It is common to get 50 small/medium tomatoes from one plant.
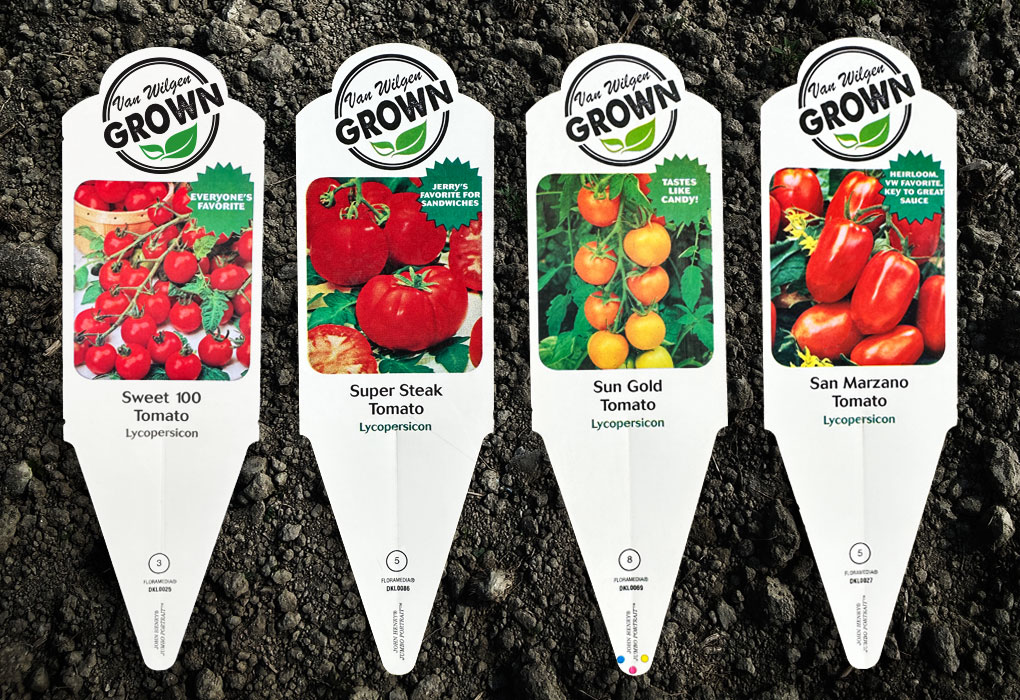
San Marzano – THE ONLY TOMATO for sauce. They are longer and skinnier than regular plum tomatoes. Juicy yet meaty and thin-skinned with a complex flavor make these a must.
Sungold – This is a cherry tomato that ripens to an orange color. One plant will yield LOTS of small tomatoes, which is good because everyone at my house pops them in their mouth every time they walk by because of their exceptionally sweet flavor. These do not ship well because they tend to pop, so get them while they last off the plant! Roast these with some garlic and basil, then blend it all up for a sweet and healthy sauce.
Super Sweet 100 – An improvement on the original, this plant produces a LOT of perfectly round bite-sized fruit. Long branches with clusters make them easy to pick quickly so you can eat them quickly too. They are high in sugar making them very sweet, and high in vitamin C so they are good for you!
Super Steak – Jerry our retired fig and tomato master used to say this was the best hybrid tomato hands down! They have excellent flavor and can get as big as TWO POUNDS! If you love a summer tomato sandwich, this is the one for you: all you need is one slice!
Quick Tomato Tips
IT’S ALL IN THE SOIL: Prevent Blossom End Rot with Calcium and Magnesium. SOILution has a lot of both from their ingredients… mix some SOILution in with your soil to keep them healthy!
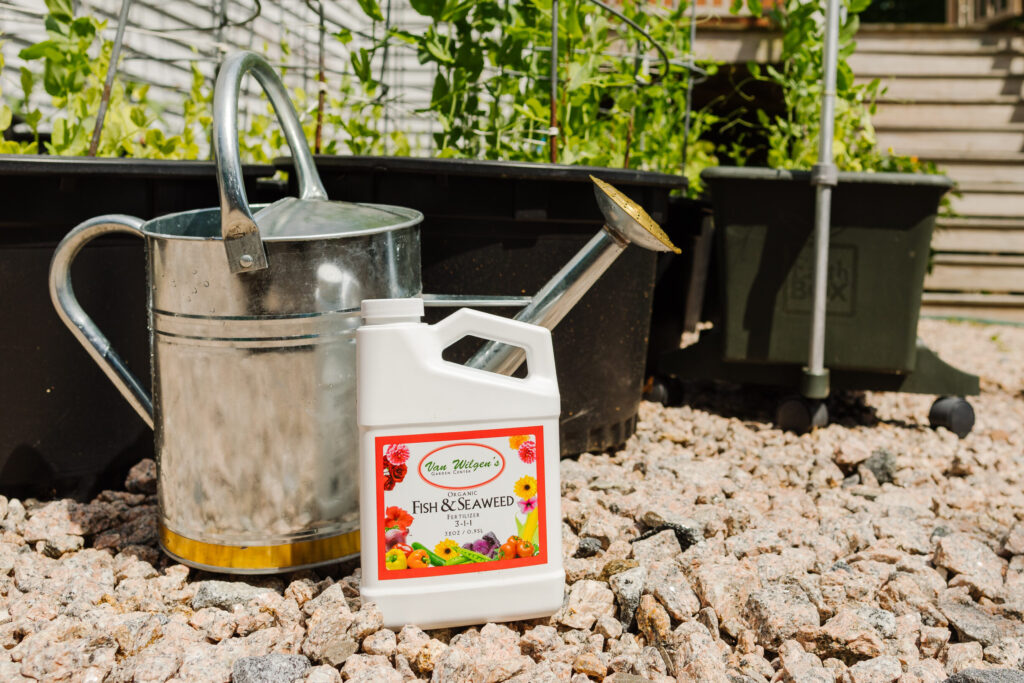
FEED ME: Fertilize fertilize fertilize… they are producing a LOT of food… they need food too. Use Van Wilgen’s Controlled Release, VW Fish and Seaweed Fertilizer, or BOTH; they will help your plant thrive and produce!
WATCH THOSE TEMPS: Make sure you wait to put your tomatoes out till the coast is clear and nighttime temps don’t drop below 55 degrees.
I SEE THE LIGHT: The more sun the better… tomatoes are using the sun for energy and they need a lot! Ensure they get a MINIMUM of 6 hours.
CHUG CHUG CHUG: Make sure you keep your tomatoes watered well! They have a very fibrous root system to soak up as much water as possible… sometimes they need water in the morning and in the evening.
This time of year, we frequently have people wondering if it’s too late to plant. We’re happy to report that fall is a FANTASTIC time to plant! Why? Well, there are a number of reasons. Cool nighttime temperatures, moderate daytime temperatures, and warm soil temperatures create favorable conditions that allow for rapid root establishment. Combine this with the fact that most plants are now finishing their top growth for the season, it allows the root system to take advantage of all the hard work your plant did during the growing season. You can certainly help your plant get ready for winter by planting with Van Wilgen’s Jump Start and amending the soil with Van Wilgen’s Premium Planting Mix. You’ll also want to make sure you water your new plant every three days if mother nature doesn’t help you out. We are never quite sure what she is up to these days.
You can still find plenty of fresh plant material here at the Garden Center that’s waiting to be put into the ground! Plant them now, and they’ll have a head start come spring!
Have questions? We’re here to help! Stop by and we can answer your questions and give you additional planting advice to ensure your plants thrive in your garden.
One of the many questions we usually start hearing this time of the year is “Can I still plant in the summer?”
We understand why people may be nervous but the answer is an overwhelming YES!
Our nursery yard is filled with beautiful specimens waiting to beautify your landscape.
Here are a few easy tips to follow before you get started:
1) Choose the right plant for the right space
If you have a sunny, dry spot you’re looking to fill, choose trees, shrubs, or perennials that will be happiest in those conditions. Similarly, avoid sun-loving plants for those shady areas.
Not sure about plant requirements? Come pay us a visit and we’ll gladly work with you.
2) Start Digging
Dig your hole twice the width of the root ball and no deeper than the height. (You want the top of the root ball either at ground level or slightly higher.) If you’re planting a container plant, make sure to score the roots first. If you’re planting a tree with a wire basket take off all the burlap as well as the basket. In both cases, this will prevent girdled roots from developing.
3) Amend your soil
Mix together Van Wilgen’s Premium Planting Mix with your existing soil. If you only add new soil, without any native soil present, the roots will stop dead in their tracks once they outgrow the pocket of nice new soil.
4) Place your plants
Place your plant into the hole you dug, making sure you’re happy with the placement and orientation. Backfill the hole with your soil mixture, tamping the soil as you go, to eliminate any air pockets.
5) Fertilize
Add Van Wilgen’s JumpStart fertilizer or our organic option, Van Wilgen’s Root Boost to the hole when planting. (Just make sure it comes into contact with the root system.)
6) Mulch
Add a 2-3” layer of Van Wilgen’s mulch around the base of the plant, in your preferred color. Be careful to leave the stem or trunk flare exposed. Over-mulching can lead to its own set of problems!
7) Water, water, water!
Water the base of the plant thoroughly while avoiding overhead watering. Your new plants will need a deep soaking two to three times a week for the first season, though with the summer heat we’re currently experiencing, you might have to water more frequently. Click here to reference our watering guide.
Now it’s time to sit back and enjoy your new plantings and some warm summer weather!
Still nervous? Here are six easy tips to follow before you get started:
- Choose the right plant for the right place. If you have a sunny, dry spot you’re looking to fill, choose a tree, shrub, or perennial that will be happiest in those conditions. Not sure about plant requirements? See a Van Wilgen’s plant expert and we’ll gladly work with you.
- Proper planting technique is crucial. Dig your hole twice the width of the root ball and no deeper than the height. If you’re planting a container plant make sure to score the roots first. If you’re planting a tree with a wire basket take off all the burlap as well as the basket. In both cases, this will prevent girdled roots from developing. For additional recommendations, be sure to reference our planting guide.
- Add Van Wilgen’s Jump Start starter fertilizer or our organic option, Van Wilgen’s Root Boost to the hole when planting. (Just make sure it comes into contact with the root system.)
- Mix together Van Wilgen’s Premium Planting Mix with your existing soil. If you only add new soil, without any native soil present, the roots will stop dead in their tracks once they outgrow the pocket of nice new soil.
- Backfill the hole with your soil mixture, tamping the soil as you go, to eliminate any air pockets. Add a 2-3” layer of mulch around the base of the plant. Be careful to leave the stem or trunk flare exposed. (Over mulching can lead to its own set of problems!)
- Water the base of the plant thoroughly. Avoid overhead watering. Your new plants will need a deep soaking two to three times a week for the first season, depending on water. Click here to reference our watering guide.
Now it’s time to sit back, and enjoy your new plants and some warm weather!
Thinking about making a raised bed for this season? Well, we’ve got the perfect recipe. A bucket of this, a bag of that, and voila, you have the perfect base to grow the most beautiful veggies. Getting the right recipe for the soil in your raised bed is as delicious as making the perfect stock for your chicken and veggie soup!
Depending on the size of your raised bed(s) and how many you will be serving, determine whether or not you will be buying your soil and compost ingredients mostly in bulk or in bags. Luckily, Van Wilgen’s offers both. It’s a one-stop shop for your recipe list!
RECIPE FOR BUYING IN BULK :
(Ideal for large raised beds or multiple raised beds)
•40% Topsoil in bulk
•40% Compost in bulk
Mix together as best you can. Do not leave in solid, unmixed layers. That leaves us with 20% more of that bed to fill. Here come the secret spices…
Fill remaining 20% of bed with equal portions of:
•Van Wilgen’s Organic Potting Soil (a perfect balance of nutrients and drainage)
•Garden Manure by Fafard (rich aged cow manure veggies love)
•Soilution by Sweet Peet (everything but the kitchen sink…Bio Char, Earthworm castings, Kelp, etc)
Mix all bags into the top 5 inches of bulk topsoil and compost blend.
RECIPE FOR BUYING IN BAGS:
(Serves 1 raised bed or small raised beds)
•40% Van Wilgens Topsoil (perfect base with great drainage)
•40% Van Wilgens Premium Planting Mix (nice blend of topsoil and compost)
Fill remaining 20% of bed with equal portions of:
•Van Wilgens Organic Potting Mix
•Garden Manure by Fafard
•Soilution by Sweet Peet
Sprinkle beds with Garden-Tone by Espoma (organic) or Van Wilgen’s All Purpose Slow Release (conventional).
Now that you have the perfectly blended base for your raised beds, time to add in veggies like tomatoes, eggplant, cucumbers, and squash.
Water and enjoy!
Note: For precise calculations, use the calculator on our website.
Remember, approximately 27 bags of soil = 1 yard of bulk soil!
Spring is here! There’s no better time to get outside and get your hands in the dirt!
Now is the ideal time to plant some cool weather vegetables and herbs. Go time is when you can work the ground and the daytime temperature is approximately 40 degrees during the day.
Early spring cold hearty vegetables:
- Beets
- Broccoli
- Kale
- All lettuce
- Onions
- Peas
- Spinach
- Swiss chard
- · Radish
- Strawberries
- Cabbage
- Cauliflower
Early spring cold hearty herbs:
- All mints
- Cilantro
- Parsley
- Thyme
- Rosemary
- Sage
- Oregano
- Chives
- Lavender
- Sorrel
- Marjoram
As spring slowly turns into summer it is now time to think about planting your summer vegetables.
While there’s no set time as to when to plant these, here are a few rules of thumb to follow:
- Do not plant until the last chance of frost has gone by, usually the last full moon in May.
- Soil temperature needs to be 65 to 70 degrees. There’s an old saying that if you did a hole and you can’t comfortably put your hand in that hole and leave it there without pulling it away because of the cold then you shouldn’t be planting your plants just yet.
- Early isn’t always better. Your plant doesn’t start growing faster just because you planted it early, it’s just the opposite.
Your plant will just sit there and not grow at all until the soil temperature warms up. And by chance, the plant gets hits with colder temps you can risk losing the plant altogether or at the very least cut your yield in half.
And I don’t know about you, but I don’t want to lose any of those delicious summer vegetables.
Summer vegetables:
- Beans
- Tomatoes
- Corn
- Cucumbers
- Peppers
- Squash
- Eggplant
- Celery
- Melons
Don’t forget to feed your plants all summer long as they will be feeding you!
The seasons have officially changed. With that, it’s time to start thinking about some new homes for all those house plants that have made their home outside for the summer. As you bring each plant in it’s a good time to clean up your plant babies, check their roots and repot if necessary.
Depending on which plants you have will depend on what soils you will use.
For most houseplants, we recommend using one of the following 3 potting mixes.
- Van Wilgen’s professional potting mix
- Van Wilgen’s premium container mix
- Cactus and Succulent soil mix
Most of your plants will do just fine with the professional potting mix, this is lightweight soil that does not retain extra moisture in your potting mix which can cause issues with some plants.
For plants that love their water, I recommend using the premium container mix.
This potting mix has a wetting agent which allows the mix to retain water which helps keep those water-loving plants very happy. Peace lilies, anthuriums, crotons, and all ferns would love this mix.
Cactus and succulents would do better if you used a cactus and succulent potting mix. This mix allows the plants to drain well while letting each plant get what it needs in the way of water. If you do not have any of this mix available go ahead and use the professional potting mix but add 1 to 2 parts sand to your mixture.
Along with cactus and succulents, I would add ZZ plants and snake plants to the list for this potting mix.
I also have a preference for what to use for repotting orchids.
We do carry both sphagnum moss and bark for orchids. Everybody has their favorite but, I prefer the bark. The bark holds just the right amount of moisture that your orchid needs. Sometimes the moss will either hold too much or too little water. And please remember to water your orchids in the sink DO NOT USE ICE CUBES! We don’t get our water from ice cubes alone and neither should our plants.
Any questions or concerns about any of your plants can be answered by any of us here at Vanwilgens garden center. Email or call us any time. We are always here to help.
Every spring our gardeners tell us they want to expand their perennial gardens to offer new colors and plants to make them fresh. For those of us that work in the Perennial department, it’s no different. We are always on the lookout for something different or even ‘new to us’. Here are a few Perennials that we think are a must-have in the garden to give you season-long color and interest.
Silene – Early spring bloom of pink on low mounding thick green leaves. Cut back by half after the first flush of flowers wanes in June, to encourage repeat blooming. Attractive to butterflies
Panicum ‘Northwind’- Wow! An unequivocally upright steel blue panicum. ! Wide, thick leaf blades a golden yellow color in the fall, topped in September with attractive narrow plumes.
Veronica Venice Blue – Gorgeous blue spikes of color late spring to mid-summer. Features large, deep blue flowers in spring over bright green, toothy leaves. Benefits from a good hard trim after flowers are finished, in order to maintain a nice tight habit.
Standing Ovation Little Bluestem- A warm-season grass that does well in poor, dry soils. Spikey bluish-green stems and leaves transition to a sizzling display of oranges, reds, yellows, and purplish-browns in the autumn. Also provides winter interest before cutting back in early spring to make way for new growth.
Oenothera Fireworks- Deep bronze foliage and red stems are contrasted by red buds opening to canary yellow blooms in June. The individual flowers may not last for more than a day or two, but they open in succession leaving the plant in continuous bloom. Burgundy rosettes in winter.
Heliopsis Burning Heart – Dynamic yellow-orange flowers are offset by their deep purple foliage. As attractive to butterflies and bees as it is to people, we’ve found this plant really deserves a place in a beautiful border, a cutting garden, or in massed swathes. She stands 4’ tall with dark red-purple foliage and abundant contrasting yellow daisy-like flowers with orange centers. The plant begins blooming in its first year and blooms from June to mid-October.
Echinacea Adobe Orange – Carefree color from a profusion of bright orange blooms that will add excitement to the summer garden. A must-have for sunny beds and borders. Drought tolerant and bred for cold hardiness and compact form with prolific flowering over an exceptionally long season.
Monarda Jacob Cline – Whorls of scarlet red tubular flowers blend perfectly with prairie wildflowers and herbs. Single plants make a great show, but groups heighten the effect. Dark green leaves have an aroma of mint and basil. Hummingbirds love it!
(Why beneficial insects really are beneficial!)
Release the hounds! Not literally, but I do want you to release the Ladybugs, Lacewings, Praying Mantids, and Nematodes. They are fantastic hunters and a huge benefit to your lawn, flower garden, and veggie garden.
These beneficial hunters have many things in common. They are meat-eaters. They never eat your plants. They only eat bad bugs. Ladybugs and Lacewings will eat aphids, whitefly larvae, mealybugs, scale, mites, and many other soft-bodied insects. Ladybugs can easily eat over 50 aphids a day. Lacewings are voracious and eat as many as 1000 per day. Nematodes are power eaters of bad bugs in the soil. They will eat over 200 insects such as cutworms, armyworms, grubs, sod webworms, fleas, fungus gnats, etc. They are the best hunters ever because you do not have to care for them, feed them or train them. Their instinct is to go where the food source is.
There are a few things you can do to make these beneficials even more beneficial. Be sure to release them all at night. Ladybugs fly away in the day. Lacewing eggs and nematodes can dry up in the hot sun. Water the garden. The first thing Ladybugs do when you release them in your garden is drink. Lacewing eggs like the moisture for hatching. Nematodes spread more quickly when kept damp. Release these hunters at the source of their food. Place Ladybugs and Lacewings at the bottom of plants. Ladybugs naturally crawl up. Lacewing eggs will hatch and the larvae will immediately eat insects dwelling on the plant. Nematodes need to be in the soil, where they can attack their unsuspecting food source. Praying Mantids can hatch right in the container but you have to release them right away so they don’t gobble each other up. Otherwise, place the Praying Mantis egg case in the crutch of a plant outside and wrap it with dental floss or thread to hold them in place.
Ladybugs don’t always stick around for a long time but this is ok! Ladybugs will feed for a little bit but most importantly, they quickly begin laying eggs on your plants. Those eggs will hatch and give you voracious Ladybug larvae. The larvae are very cool. They look like mini black alligators with orange spots and they are hungry for bad bugs in your garden. When the Lacewing larvae hatch from the eggs you released, these Aphid Lions have serious munchies and eat over 1000 bad insects per day. Lacewings can have multiple generations in one season. How awesome is that!? Nematodes have been known to hang around in the soil, eating plant damaging insects for 2 years straight. Praying Mantids will mate and lay more egg cases on your plants for next season hatching.
These hunters are so easy to have around the yard. You will barely notice them but they will be very busy helping you eliminate plant damaging insects. Let them go and they will reduce your need to use pesticides in your gardens, they will keep your plants healthier, and they will become an integral part of your garden community.
Note: The Ladybugs that you buy from Van Wilgen’s are not the ones you see inside your homes. The beneficial Ladybugs are native to the USA and do not invade homes.
SHOPPING LIST:
*Ladybugs
*Lacewings
*Nematodes
*Praying Mantis
On any given day you can visit the garden center and overhear customers asking for ‘’dwarf” plants. Usually, when the term dwarf comes to mind we think of small shrubs and flowering plants. Well, surprisingly those aren’t the only dwarf plants we offer at the garden center. We have a great selection of dwarf trees!
We like to refer to them at Van Wilgen’s as “Small Space Trees”. If you are like me and have a small yard but want to plant trees there are some awesome options out there. Here is a list of my top ten favorites. Many of them I have planted in my yard and love them! I invite you to come and visit the garden center and check them out.
- Limelight Hydrangea Tree- Awesome white flower color from summer to fall. Van Wilgen Grown
- Rising Sun Red Bud-Great early spring color, first to flower. One-of-a-kind foliage color!
- Thundercloud Plum-Small pink flowers followed by purple leaves. Van Wilgen Grown
- Coral bark Japanese Maple-Winter is when it’s at its best! Coral-pink bark all winter long!
- Scarlet Fire Dogwood-New disease-resistant hybrid. Deepest pink flower for a kousa. Great texture to bark and excellent fall color.
- Little Poncho Dogwood-The name says it all. For those that want a Kousa dogwood but don’t have a lot of space! Mine at home flowers for 6 weeks plus!
- Rhode Island Red Japanese Maple-great upright maple but on a very small scale. Deep red foliage all season.
- Baby Blue Spruce-this grafted spruce has the deepest blue color and keeps it!